Since I wrote my last Blog post much time has past. After my last exam last
Friday I just started to do some hacking on KDE. As it should be something simple
for the beginning and something useful, too, I decided to provide a new plasma
dataengine for retrieving stocks information.
I used ruby, because plasma hacking with ruby is freaking awesome and totally
easy. Let’s prove it!
How To Use It
Before diving into the
development process, you probably want to test the final result yourself.
First you have to download the plasma package. Then you can install
it easily with the plasma package manager.
You won’t need to be root for that. You should get a success response afterwards.
As there is by now no plasmoid to display the provided data, you have to use
the plasmaengineexplorer to test the engine. Call this program on your shell
and look for ruby-stocks. You have to type in a stocks symbol like GOOG (Google)
or NOK (Nokia) to get the information. Is is also possible to just call:
plasmaengineexplorer --engine ruby-stocks --source NOK
You can remove the engine with this short command:
plasmapkg -t dataengine -r ruby-stocks
How To Create It
I started with a look on the plasma ruby examples and copied the inital
construct from the given time data engine example. There was also an attempt to
create a stocks engine with C++. The code is available in the playground.
The most time took the clean implementation of the cvs data parsing.
If you want to start yourself with a ruby based dataengine, I recommend to start
with the time engine example, too. Do not change the given file structure,
which should be:
The top directory gets packaged into a zip for distribution.
Let’s take a look on the main.rb. There a some important things you have to be
aware of, when you want to use ruby for plasma dataengines:
when you name your engine “ruby-stocks” (see metadata.desktop), you have to
name the top module RubyStocks. Otherwise your engine will fail.
Plasma looks for a class called Main in that module, which have to inherit
from PlasmaScripting::DataEngine
make sure, that you implement the member methods:
sourceRequestEvent and updateSourceEvent
As both methods should do the same in my example, I used an method alias.
If you ever did a plasma dataengine using C++ you have noticed, that it is a
straight forward port from C++ to ruby. There is hardly something different.
# file: 'main.rb'# kate: remove-trailing-space on; replace-trailing-space-save on; indent-width 2; indent-mode ruby; syntax ruby; replace-tabs on; replace-tabs-save on; space-indent on;require'plasma_applet'# the dictonary replaces the ruby hash as we need an ordered hash. only ruby 1.9 uses ordered one.# when ruby1.9 is the default version, we can switch back to native ruby hashrequire'dictionary'moduleRubyStocksclassMain<PlasmaScripting::DataEngine# the url needs to be extended by the stock ID at the end of the string# format code: http://brusdeylins.info/projects/yahoo-finance-api/DATA=Dictionary["j1"=>["market capitalization",Float],"p2"=>["percent change",String],"s0"=>["symbol",String],"d1"=>["last trade date",Qt::Date],"t1"=>["last trade time",Qt::Time],"c1"=>["change",Float],"o0"=>["open",Float],"h0"=>["days high",Float],"g0"=>["days low",Float],"v0"=>["volume",Float],"a2"=>["average daily volume",Float],"l1"=>["last trade",Float],"c4"=>["currency",String]]SOURCE_URL="http://download.finance.yahoo.com/d/quotes.csv?f=#{DATA.keys.join}&e=.csv&s="definitializeparent,args=nilsuperparent# don't update faster than once a minutesetMinimumPollingInterval60000# dafault update rate is 10 minutessetPollingInterval600000enddefupdateSourceEventsourcerequest_url=SOURCE_URL+Qt::Url::toPercentEncoding(source).data.stripjob=KIO::storedGetKDE::Url.new(request_url),KIO::NoReload,KIO::HideProgressInfojob.connect(SIGNAL('result( KJob* )'))do|aJob|parseCSVLinesource,aJob.dataendreturnfalseenddefparseCSVLinesource,dataByteArray$stderr.puts"ruby-stocks plasma dataengine: retrieved data: "+dataByteArray.datadataArray=dataByteArray.data.strip.split","ifdataArray.size>=DATA.sizeDATA.values.eachdo|aValue|data=dataArray.shiftunlessdata=~%r{N/A}ifaValue[1]==Floatdata.gsub!/B$/,"E6"data.gsub!/M$/,"E3"setDatasource,aValue[0],data.to_funlessdata=="N/A"elsifaValue[1]==Stringdata=data[1..-2]setDatasource,aValue[0],dataunlessdata.empty?elsifaValue[1]==Qt::TimesetDatasource,aValue[0],Qt::Time.fromString(data,'"h:mmap"')elsifaValue[1]==Qt::DatesetDatasource,aValue[0],Qt::Date.fromString(data,'"M/d/yyyy"')endendendendendaliassourceRequestEventupdateSourceEventendend
The second file you need is the metadata.desktop.
# file: 'metadata.desktop'
[Desktop Entry]Name=Stocks Data EngineComment=Stocks Data Engine powered by Yahoo! Finance (real time delayed by around 15 minutesType=ServiceServiceTypes=Plasma/DataEngineX-Plasma-API=ruby-scriptX-Plasma-MainScript=code/main.rbX-KDE-PluginInfo-Author=Robert RiemannX-KDE-PluginInfo-Email=saloution@googlemail.comX-KDE-PluginInfo-Name=ruby-stocksX-KDE-PluginInfo-Version=1.0X-KDE-PluginInfo-Website=http://plasma.kde.org/X-KDE-PluginInfo-Category=Online ServicesX-KDE-PluginInfo-Depends=X-KDE-PluginInfo-License=GPLX-KDE-PluginInfo-EnabledByDefault=true# Icon=alarmclock
What Comes Next?
The engine should be quite usable by now. I plan to create a plasmoid which
lets you search for a company name to get the stocks symbol and then shows
some important numbers (like the weather widget, but without these nice graphics).
After that I want to create a second plasmoid which just shows a chart from
Yahoo! Finance. The most work will probably be to create a settings dialog similar
to the one you find here below the chart.
What do you think? Would you use a stocks plasmoid? What do you expect it to display?
Why didn’t you have already used ruby to create a dataengine? And after all,
how do I get this engine into KDE trunk?
Hi planetkde, hi readers from planet gnome (so called aliens1),
I’ve just stumbled upon a blog post dealing with a potential
collaboration of KDE and gnome to initiate a replacement for dropbox, called
ownCloud.
There are already thoughts about possible GSoC projects giving attention to the
gnome/KDE frontend clients and to the server backend.
Nice idea, but in my humble opinion there is a problem, at least for me:
I haven’t a hosted root server, but a lot of unix accounts with user webspace,
where it is impossible to run any kind of background services/daemons.
Think of:
university accounts
(scientific) institute accounts
accounts from your IT related work
Think of people, who probably use linux.
In the case that ownCloud is meant to be the centre of all data synchronisations,
it would be sad that those people who only have webspace cannot take advantage of it.
So I encourage the developer to design the ownCloud in a way that makes the
server-side backend software only optional, but not a requirement.
This would be similar to git, which can use a server side backend (git://), but
is also satisfied with a simple sftp connection (ssh://).
(Please correct me if I am wrong.)
After all you might want to read an article about the disadvantages of
SaaS published by http://www.gnu.org. Exaggerated message in one sentence: Don’t get dependant of other
people server services.
In my last blog entry I explained how to send the clipboard content via
KDE Klipper to a pastebin service.
Now I wrote a quick-and-dirty script to transform a URI in the clipboard to a
shortenend version using http://ur1.ca (U R One; it is GPL).
I never figured out how to get automatic URL shortening with http://identi.ca
and Choqok. That’s a kind of universal work-around for me.
Copy the file ur1.rb to a folder which is in your $PATH and add a Klipper
action as I explained in the last post. To setup your Klipper action you will
need the following:
When you are a power IRC user, you might know the problem. You cannot copy the
whole source code, error message or log file etc. directly in the IRC channel.
You need a pastebin. I like http://pastie.org really much. It has a clean
interface and supports highlighting for many languages. But how to copy the text
to the pastebin in a handy and short way?
Do the following to copy the clipboard content to the pastebin by a simple
<Ctrl>+<Alt>+<R> (global shortcut to open Klipper actions) and a click:
Copy the file pastie.rb to a folder which is in your $PATH
Make the file executable for you
Edit the actions of Klipper and add for the .* Regexp (means: no special string)
a new action (do not activate automatic).
Add the command echo '%s' | pastie.rb, feedback should go to clipboard and
set the description to “post as plain text” for instance
You can add another command echo '%s' | pastie.rb -f ruby to paste the text with
ruby syntax highlighting
After that you should be able to send your clipboard to the pastebin with one
selection (to copy text into clipboard), one hotkey (to trigger Klipper actions)
and one click (to choose between different highlighters). You can paste the URL
with a single click on the middle button of your mouse. You don’t even have to
open the pastebin page yourself!
I like it. Just want to share this with you in the case you was locking for
something similiar. :)
pastie.rb
Copy this file to your ~/bin and make it executable.
A big thank to the unknown author of this file. I found it via google on
http://pastie.org and did only some minor modifications on it.
You can use the pastie.rb script via command line by pipe a file to it.
To set the code highlighting use the switch -f LANG. To get all supported
languages you want to try a pastie.rb -h.
#!/usr/bin/env ruby# kate: remove-trailing-space on; replace-trailing-space-save on; indent-width 2; indent-mode ruby; syntax ruby;# file: pastie.rbrequire'net/http'require'optparse'require'timeout'require'cgi'require'uri'classHashdefto_query_stringmap{|k,v|ifv.instance_of?(Hash)v.map{|sk,sv|"#{k}[#{sk}]=#{sv}"}.join('&')else"#{k}=#{v}"end}.join('&')endendmodulePastieAVAILABLE_PARSERS=%w( objective-c++ actionscript ruby ruby_on_rails diff
plain_text c++ css java javascript html html_rails shell shell-unix-generic
sql php python pascal perl yaml csharp go apache lua io lisp d erlang fortran
haskell literate_haskell makefile scala scheme smarty ini nu tex clojure
)classAPIPASTIE_URL=URI.parse"http://pastie.org/pastes"defpaste(body,format='plain_text',is_private=false)raiseInvalidParserunlessvalid_parser?formathttp=Net::HTTP.newPASTIE_URL.host,PASTIE_URL.portquery_string={:paste=>{:body=>CGI.escape(body),:parser=>format,:restricted=>is_private,:authorization=>'burger'}}.to_query_stringresponse,body=http.startdo|http|http.postPASTIE_URL.path,query_stringendraisePastie::Errorunlessresponse.code=='302'response['location']endprivatedefvalid_parser?(format)Pastie::AVAILABLE_PARSERS.include?formatendendclassError<StandardError;endclassInvalidParser<StandardError;endclassConsoleOptionsattr_reader:parser,:optionsdefinitialize@options={:format=>'plain_text',:private=>false}@parser=OptionParser.newdo|cmd|cmd.banner="Ruby Pastie CLI - takes paste input from STDIN"cmd.separator''cmd.on('-h','--help','Displays this help message')doputs@parserexitendcmd.on('-f','--format FORMAT',"The format of the text being pasted. Available parsers: #{Pastie::AVAILABLE_PARSERS.join(', ')}")do|format|@options[:format]=formatendcmd.on('-p','--private','Create a private paste')do@options[:private]=trueendendenddefrunarguments@parser.parse!(arguments)body=''Timeout.timeout(1)dobody+=STDIN.readendifbody.strip.empty?puts"Please pipe in some content to paste on STDIN."exit1endpastie=API.newputspastie.paste(body,@options[:format],@options[:private])exit0rescueInvalidParserputs"Please specify a valid format parser."exit1rescueErrorputs"An unknown error occurred"exit1rescueTimeout::Errorputs"Could not read from STDIN."exit1endendendif($0==__FILE__)app=Pastie::ConsoleOptions.newapp.run(ARGV)end
I really wonder why there are no Konqueror related idea for a GSoC 2010 project
in the KDE Community Wiki.
The last opensuse version ships Firefox as default browser, there are some other
attempts of a kde based browser (rekonq, etc.), but I think that nothing can
replace Konqueror in the next time concerning consumption of resources.
Konqueror is so fast using pdf viewer KPart Okular while Firefox almost hangs up
with proprietary plugin adobe reader. Which other browser can split its view
and show pdf viewer and webpages at the same time? KatePart is also very handy.
I mean it’s wrong to think that other Qt based browsers can replace Konqueror in
the next time. Even the inexperienced user wants to use KPart Okular.
However, I use Firefox, because it doesn’t use kthml has awesome bookmark tagging
and can be synced with Mozilla Weave. It would be nice to see these features
prospectively integrated in Konqueror, too.
What do you think? Can we bring Konqueror to the next level?
 Before diving into the
development process, you probably want to test the final result yourself.
First you have to download the plasma package. Then you can install
it easily with the plasma package manager.
Before diving into the
development process, you probably want to test the final result yourself.
First you have to download the plasma package. Then you can install
it easily with the plasma package manager.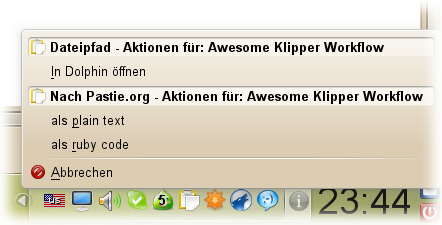 When you are a power IRC user, you might know the problem. You cannot copy the
whole source code, error message or log file etc. directly in the IRC channel.
You need a pastebin. I like
When you are a power IRC user, you might know the problem. You cannot copy the
whole source code, error message or log file etc. directly in the IRC channel.
You need a pastebin. I like 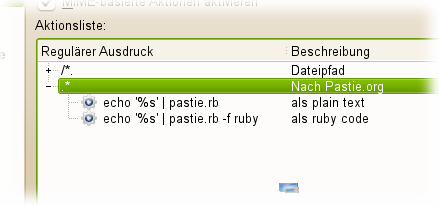 After that you should be able to send your clipboard to the pastebin with one
selection (to copy text into clipboard), one hotkey (to trigger Klipper actions)
and one click (to choose between different highlighters). You can paste the URL
with a single click on the middle button of your mouse. You don’t even have to
open the pastebin page yourself!
After that you should be able to send your clipboard to the pastebin with one
selection (to copy text into clipboard), one hotkey (to trigger Klipper actions)
and one click (to choose between different highlighters). You can paste the URL
with a single click on the middle button of your mouse. You don’t even have to
open the pastebin page yourself!